Role Management
Introduction to Role Management
Use role management to establish what type of Portal access your Contacts will have when they visit the site.
Roles or Group Roles can be assigned to individual Contacts, specific Pages or Sub-lists which you can then allocate the access to view, edit and create new items in the Portal.
A Role can be assigned to Contacts, Pages and Sub-lists to give various permissions to the User to Access, Edit and Create in the Portal.
A Role Group is a collection of Roles to enable you to quickly assign multi-level access to a Contact rather than having to assign each individual role to those users.
You are able to assign as many roles and groups as you like to a Contact, including combinations of the two.
Please note the roles assigned to the Contact need to match with the roles assigned to the Pages and/or Sub-lists in order for the Access, Edit and Create action to be enabled. This applies to both Roles and Role Groups as well.
Roles
You have the freedom to choose one or a combination of 16 Roles + 1 Admin Role which can be assigned individually, or multiple in a Role Group to Contacts, Pages and Sub-lists.
The Admin Role is a special ‘Super User’ role that has access to everything on the portal.
 Tip
Tip
Please note names of the pre-existing roles in Gold-Vision are generic and they are not associated with a specific actions unless assigned as a role for Access, Edit and Create against Pages, Sub-lists or Contacts.
 Info
Info
You can assign multiple roles at the same time using Role Groups
Create a Role Group
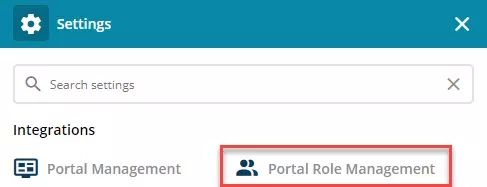
Go to Settings > Portal Role Management
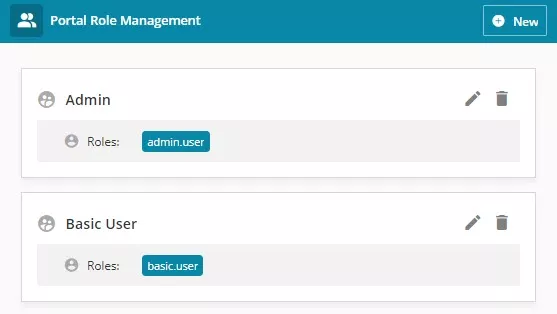
By default you’ll have two Groups, an Admin and a Basic.
The Admin Role is a special ‘Super User’ role that has access to everything on the portal.
The Basic User Role doesn’t allow special access to anywhere.
To Create a Group
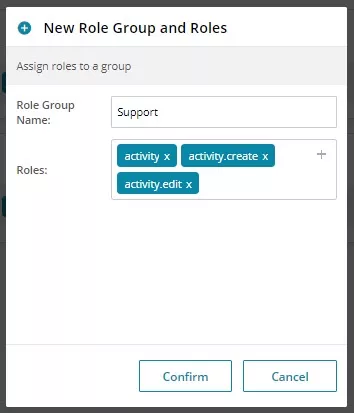
Click on the New button
Role group Name – Where you enter the name for your Role Group, for example “Sales”, “Support Team”, etc.
Roles – This is where you will select which Roles you wish to be included in the Group.
Simply select the + button next to the Roles and select as many roles as you wish to include in the Group and press Continue.
From the Role Management screen you’re also able to edit existing Groups and Delete them

Assign a Role to a Page
Go to Portal Management and select “Space Designer” against your portal.

Select Pages and click on a Page, this will display the Settings for the page. Here you can select which roles will have access/editability.

Pressing the + on Access will bring up a list of all Roles on the system, simply click on each role that will have access to this page
Similarly the + on Editability works in the exact same way, except any roles you select here will be able to edit the page.

Info
Please note the roles you have selected for Access and/or edit need to match the roles assigned to the Contact individually or in a Role Group in order for the access or edit functionality to be enabled.
Remember to save your changes and publish the portal before continuing.
Assign a Role to a Sub-list
The Account Page contains sub-lists, which also need to have Roles set against them to determine who has access to the Sublist, Edit and/or Create rights.
Click on the Sub-lists tab of a page then click on the Settings Cog next to the sub-list you wish to amend.

You’ll see Access, Edit and Create options, these work exactly the same as the Access and Editability drop downs, simply select the roles you wish to have Access, Edit and Create rights for the sub-list and press Continue
Info
“Everyone” is a role that only exists in the Space Designer, essentially letting everyone have those rights unless you change it to something else.
Please note the roles you have selected for Access, Edit and/or Create need to match the roles assigned to the Contact individually or in a a Role Group in order for the access, edit and create functionality to be enabled.

Info
Remember to save your changes and publish the portal before continuing.
Bulk Role Assignment
Go to View Contacts and click on Select

Select the Contacts you want to assign the roles to then click on Assign Portal Roles and Groups, select the roles and groups and click Save.
 Related articles