Data Import Tips
Match Keys
The field is used to uniquely identify the object. For example, if Account Name and Postcode checked the import will search for the same Account name and postcode and if they are the same will assume they are a match and update the line. Each object is highlighted in a different colour, so be sure to look through the whole grid. I.E if you are importing Accounts AND Contacts, the Account fields will be highlighted in a different colour to that of the Contact fields. There is a limit of 5 match keys per object. Please note – drop downs cannot be used as a match key.
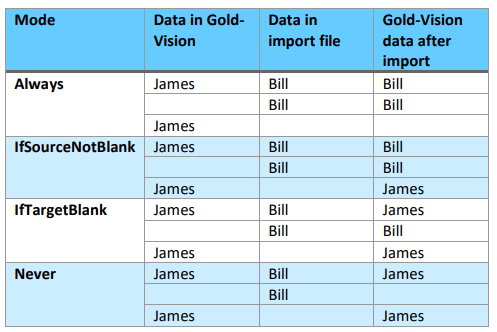
Overwrite Mode
There are four options:
o Always – always updates the column no matter what.
o IfSourceNotBlank – updates only if the file field contains data.
o IfTargetBlank – updates only if the Gold-Vision field doesn’t contain data.
o Never – Never updates, only adds.
Saving a test import
We recommend importing a small number of sample rows (and check the results) before you embark on a new, large import.
Save the mapping then once the test rows have imported, upload the main file and select Load
Drop Downs
The import tool will identify any missing drop downs and give you the options to add them. Note: If you don’t add the missing drop down values the row will fail to import.
Errors
Field not mapped – click back to map the field
Field too long – check original cvs file
Incorrect date format – used YYYY/MM/DD or DD/MM/YYYY – amend the cvs file and retry the import
Viewing the data in Gold-Vision
To manage and view your imported Data into Gold-Vision use the Import Source field to filter on. You can bulk replace fields once the data is imported but note that this will remove the import source information so that it won’t be filterable in future. You may want to copy the source into another text field or create a new source against accounts and contacts which you can copy this information into via the bulk replace facility.


